Get Rid of Black Line Border Word Outlook
Word has a set of AutoFormat shortcuts that make horizontal lines, here's how they work, how to change them, color the lines and how to stop lines when they get out of control.
Line shortcuts
There are six horizontal line shortcuts. For each one type the same character three times at the start of a new line then press Enter.
For example, press the dash key three times on a new line, then enter.

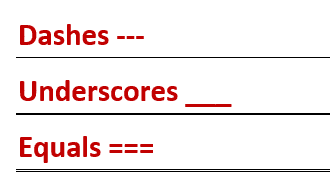
Dashes give you a horizontal line
Underscores give you a bold horizontal line
Equals gives you a double horizontal line
And there's more …
The three above are the best known but there are others.
Asterisk makes a dotted line
Tilde makes a wavy line
Pound/Hash makes a triple line
Tooltip controls
Whenever you automatically make a line, a small tooltip appears with some options.

Undo Border Line – changes back to the characters you typed. The usual undo shortcut, Ctrl + Z, will do the same thing.
Stop Automatically Creating Border Lines – will turn off the AutoFormat | Border Lines option entirely.
Control AutoFormat Options … goes to the settings for AutoFormat as you type.
Autoformat Options
The automatic lines and all other AutoFormat options are controlled from Options | Proofing | AutoCorrect options | AutoFormat As You Type:

Border lines can be turned on/off from there. There are no options to select just some character/line combinations – it's all or nothing.
Under the hood
Word isn't making the lines by adding a lot more characters across the page. That's where confusion can begin if you're trying to stop the lines appearing.
It's converting your dash/underscore/equals etc. into a paragraph border. Specifically, a bottom border line on the paragraph.
For example, here's how an automatic double horizontal line appears in Paragraph | Borders and Shading

It's just the double line style applied to the bottom line of the paragraph. Strictly, at the bottom of group of paragraphs with the same formatting. Knowing that detail is useful when you're fixing the extra lines that start appearing.
Color
The automatic lines are always black (actually 'Automatic'). Word doesn't pick up the color of the three characters nor the paragraph as you might expect.
To change the line color, select the line then go to Home | Paragraph | Borders | Borders and Shading. Select the color you want from the pull-down list and then click on the borders you want the color change to apply.

Other lines
You're not limited to the lines that Microsoft provides via AutoCorrect. You can add your own or change the look of a line added with AutoCorrect.
Select the line then go to Home | Paragraph | Borders | Borders and Shading. That opens up the many options you have:
Styles: there are over 20 line styles to choose from.
Color: as mentioned above, the full Word color range is available.
Width: thin, medium or thick – take your pick from ¼ point to 6pt.
Top, bottom, left, right – click in the preview box to choose which lines to show and the style of each one.
Whatever you choose, remember to click on the line/s in the preview box to apply the look you want.
For consistency, you can have a horizontal line as part of a paragraph style. For example, a line above or below a heading.
Unwanted horizontal lines
A common problem with the automatic lines is extra lines appearing where you don't want them.
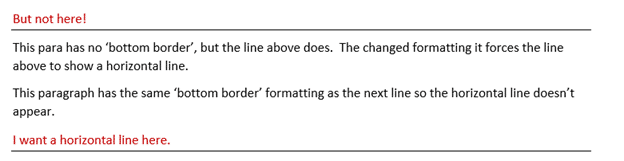
It happens when you add paragraphs immediately above the horizontal line. Each of those paragraphs inherits the same (bottom border) formatting that Word made for the horizontal line.
You won't see a line under each paragraph because Word groups together paras with the same formatting. Only the last paragraph of a group will have a bottom border line.
The problem usually rises because people try to fix the extra lines by selecting just the paragraphs showing horizontal line and change the formatting.
That doesn't change the 'bottom border' formatting for other lines that have the setting. So it seems like extra lines keep popping up without reason!
The solution is to make sure you select all the affected paragraphs – not just the ones with horizontal lines.
Choose a paragraph and look carefully at the Home | Paragraph | Borders icon. That icon changes according to the current border settings. In this, enlarged, example you can see the bottom line is solid.

To change the border setting, pull-down the borders list and choose 'No Border'.

To stop the creeping lines in the first place, get into the habit of not adding extra paragraphs from the horizontal line itself. Instead, go to the paragraph ABOVE the horizontal line and add new paras from there.
Five ways to add vertical lines in Word
Six Word tricks to reduce space between lines
Multi-Line Picture Borders in Word or PowerPoint
Create your own I ♥ Love…. Signs in Word
Get Rid of Black Line Border Word Outlook
Source: https://office-watch.com/2020/making-lines-in-word-and-stopping-them/